Merge Excel Files with Multiple Sheets
Today, we’re answering a question we received about how to combine multiple Excel workbooks into a single workbook, even when there are a variable number of worksheets within each workbook. This post shows how to use Power Query to accomplish it. Let’s jump right in!
Video
Classic Problem, User-friendly Solution
In handling large datasets or working on various projects, it sometimes becomes necessary to merge multiple Excel workbooks and worksheets. Thanks to a neat feature in Excel called Power Query, we can accomplish this task with ease. And don’t worry if you’re new to the world of Power Query, we will walk through it step-by-step in the three exercises presented.
Exercise 1: Storing the Data Folder Path
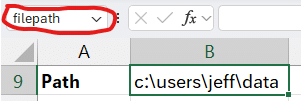
First, we need to store the path to the data folder containing our workbooks. We’ll store it in a cell inside the import destination workbook.
Once we enter the path, we need to name the cell. We will name it ‘filepath’ but you can use a different name if desired. Just avoid spaces and funky characters. In Excel, naming a cell is pretty straightforward: simply select the cell, head to the Name Box, type in your preferred name and hit Enter.
Note: if you choose name other than ‘filepath’ you will need to update the M code accordingly.
With the data path stored in a named cell, we are ready for the next exercise.
Exercise 2: Harnessing the Power of Power Query
Having named our cell, we now enter the world of Power Query, which we’ll use to merge our workbooks.
Inside Excel, head to Data > Get Data > From Other Sources > Blank Query.
Inside the resulting Power Query dialog, head to View > Advanced Editor.
Erase any existing code, and paste the following M code to create our basic query:
let
MyFiles = Excel.CurrentWorkbook(){[Name="filepath"]}[Content]{0}[Column1],
Source = Folder.Files(MyFiles),
#"Added Custom" = Table.AddColumn(Source, "Sheets", each Excel.Workbook(File.Contents([Folder Path]&[Name]))),
#"Expanded Sheets" = Table.ExpandTableColumn(#"Added Custom", "Sheets", {"Name", "Data", "Item", "Kind", "Hidden"}, {"Name.1", "Data", "Item", "Kind", "Hidden"}),
#"Expanded Data" = Table.ExpandTableColumn(#"Expanded Sheets", "Data", {"Column1", "Column2"}, {"Column1", "Column2"}),
#"Removed Other Columns" = Table.SelectColumns(#"Expanded Data", {"Column1", "Column2"})
in
#"Removed Other Columns"
Note: if you named your folder path cell something other than ‘filepath’, remember to update that here.
Hit Done.
Just like that, Power Query swoops into our data folder, pulls in all the workbooks in that folder and any subfolders, grabs the worksheets, and perfectly aligns everything based on the column labels. You should see a preview of the data, which would look something like this:

You can then send this data back to your Excel workbook by going to Close & Load To and selecting the load destination worksheet. It should flow to your worksheet like this:

Now, the M code above is just a base code that you can further customize as needed. For example, it assumes the data has only two columns. If it has more, you can customize the base query. Also, if you’d like to add columns for the source workbook or source worksheets, we can do that customization as well. Or, perhaps you want to exclude certain files from the source data folder. Or perhaps you’d like to filter the data, reorder the columns, or rename the columns.
Power Query has tons of transformations you can use to modify this basic query results as desired. Too many to cover here. But, I’ll walk through a few to give you an idea.
Exercise 3: Cleaning Up the Data
Now that we have successfully merged the data, we can clean it up by promoting and filtering headers, adjusting the column count, and filtering file lists, among others.
Edit the query to head back to the Power Query editor. You can click any Applied Step to view the data at that point. You can click the gear icon next to the Applied Step to edit the settings. You can also add or delete steps as desired.

Here are a few customizations you may want to make.
- Click the gear icon on the Removed Other Columns step to include any additional data columns your data may have. You can also include the workbook name, worksheet name, folder path, or any other columns you’d like to flow through to your worksheet.
- Home > Use First Row as Headers to promote header values
- Use a column filter control to filter out any header values from the data range
- Click the Source step to filter the files based on attributes such as extension, name, date, or path
- Rearrange column order with a standard drag-and-drop, or rename columns with a double-click
- Add any additional columns or further make transformations as desired

Once your customizations are complete, close and load to send the data to a worksheet.

Conclusion
With Power Query to our rescue, merging multiple workbooks and sheets becomes a breeze, totally achievable even for Excel beginners. We hope this has been a helpful guide. If you have further questions or suggestions, do leave a comment below.
Sample File
For a hands-on exploration, you can download the sample file.
FAQ
Q: What happens if the workbook is inside the same data folder?
A: That would result in complications as Power Query will attempt to include it in the merge process. We suggest keeping the workbook outside the data folder to avoid this issue.
Q: What is Power Query and why is it useful in Excel?
A: Power Query is a feature in Excel that allows for advanced data processing and manipulation. It is particularly useful for tasks like merging multiple workbooks and sheets, handling large datasets, and performing complex data transformations. Power Query provides a user-friendly interface to manage and automate these processes efficiently.
Q: How do I store the path to the data folder containing my workbooks in Excel?
A: To store the path to your data folder in Excel, enter the path in a cell within your import destination workbook and then name the cell. For instance, you can name it ‘filepath’. To name a cell, select it, go to the Name Box, type in your preferred name, and press Enter.
Q: What are the basic steps to merge workbooks using Power Query in Excel?
A: To merge workbooks using Power Query, start by storing the data folder path in a named cell. Then, use Power Query to create a query that pulls in all workbooks from the folder, extracts the worksheets, and aligns the data based on column labels. This involves navigating to ‘Data > Get Data > From Other Sources > Blank Query’ and using the M code provided in the blog post.
Q: Can I customize the M code in Power Query to suit my specific data needs?
A: Yes, you can customize the M code in Power Query. This might include adjusting for more than two data columns, adding columns for source workbooks or worksheets, excluding certain files, filtering data, reordering columns, or renaming columns. Power Query offers a wide range of transformations to modify your query results as needed.
Q: How do I promote header values and adjust column count in Power Query?
A: To promote header values and adjust column count in Power Query, go to the Power Query editor, use the ‘Home > Use First Row as Headers’ option to promote header values, and click the gear icon on the ‘Removed Other Columns’ step to include additional data columns. You can also filter, rearrange, or rename columns and make other transformations as desired.
Q: Is there a way to filter out specific files or data when merging Excel workbooks using Power Query?
A: Yes, you can filter out specific files or data when using Power Query. In the Power Query editor, you can use the column filter control to exclude certain header values, or click the Source step to filter files based on attributes like extension, name, date, or path.
Q: Are there any resources available for a hands-on exploration of merging multiple books and sheets in Excel?
A: Yes, for a hands-on exploration, the blog post provides a sample file named ‘MergeMultipleBooksSheets.xlsx’ which can be downloaded. This file allows you to practice and understand the process of merging multiple books and sheets in Excel using Power Query.
Q: Can Excel beginners effectively use Power Query to merge multiple workbooks and sheets?
A: Yes, even Excel beginners can effectively use Power Query to merge multiple workbooks and sheets. The blog post provides a step-by-step guide and M code, making the process accessible and manageable for users with varying levels of Excel proficiency.
Excel is not what it used to be.
You need the Excel Proficiency Roadmap now. Includes 6 steps for a successful journey, 3 things to avoid, and weekly Excel tips.
Want to learn Excel?
Our training programs start at $29 and will help you learn Excel quickly.
Creating a listing of the files from a folder with the full path and file name, is it possible to create a hyperlink within query?