How To Get A Free Loan Amortization Template
If you’ve ever wondered how to track your loan payments and balances, you’re in the right place! In this post, we’ll walk through how to get, use, and customize a free loan amortization schedule template directly from within Microsoft Excel. Let’s dive in!
Video
Step 1: Downloading the Free Amortization Schedule Template
Did you know Microsoft provides hundreds of free Excel templates? Here’s how you can quickly find and download the loan amortization schedule template:
From within Excel, go to File > New: This opens a gallery of free templates.
Search for “Amortization Schedule”: Use the search bar to find the loan amortization templates.

Select and Create: Browse the options, pick a template that suits your needs, and click Create.

That’s it! The template is ready to use. Microsoft offers many other templates, so feel free to explore for other financial or organizational tools.
Step 2: Exploring and Using the Template
Once you’ve downloaded the template, it’s time to explore its features. Let’s take a look at the key sections and how to update them.
Renaming the Template
You can rename the workbook or the sheet to better reflect your loan, such as “Car Loan Schedule” or “Home Loan Tracker.” Just double-click the sheet tab or save the file with your preferred name.
Key Input Fields
The template includes several essential fields for your loan information:
- Loan Amount: Enter the total amount of the loan (e.g., $5,000).
- Annual Interest Rate: Add the yearly interest rate as a percentage.
- Loan Period in Years: Specify the loan’s duration in years.
- Payments per Year: Typically, this is 12 for monthly payments.
- Start Date: The first payment date.
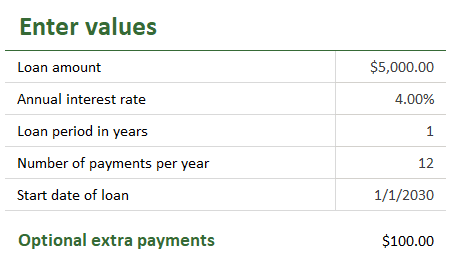
There’s even an option to add extra payments if you plan to pay more than the scheduled amount each month.
Automatic Calculations
As you fill in the inputs, the template calculates:
- Scheduled Payment Amount: The fixed payment based on your loan terms.
- Total Interest: The total interest you’ll pay over the life of the loan.
- Number of Scheduled Payments: How many payments are required.
- Actual Number of Payments: Adjusted if extra payments are made.

The Amortization Table
The main table displays details for each payment, including:
- Payment number and date
- Beginning balance
- Scheduled and extra payment amounts
- Breakdown of principal and interest
- Ending balance
- Cumulative interest

Step 3: Customizing and Maintaining the Template
Now that the basics are covered, let’s explore how to customize the template to suit your needs.
Adjusting the Loan Period
The amortization table automatically fills rows based on the loan period. For instance:
- A 2-year loan will populate 24 rows (2 years × 12 months).
- A 10-year loan will fill 120 rows.
But what if your loan period exceeds the pre-filled rows (e.g., a 30-year mortgage)? Here’s how to extend the table:
- Scroll to the Bottom of the Table: Locate the small handle in the lower-right corner.
- Drag to Extend: Click and drag the handle down to add rows. The formulas will automatically fill into the new rows.
- Verify and Update: Set the loan period to 30 years (or another value) and confirm the table updates properly.
Changing the Table Style
Excel tables come with various formatting options to make your schedule easier to read:
- Click anywhere in the table.
- Navigate to the Table Design tab in the ribbon.
- Choose a style (e.g., banded rows for better readability).
The formatting applies to the entire table, including newly added rows.
Why Use This Template?
This free loan amortization schedule template is a powerful tool that:
- Saves time by automating calculations.
- Provides clear insights into loan balances and interest over time.
- Offers flexibility for customization and extra payments.
Plus, with the ability to extend the table and explore different formatting styles, it adapts to loans of any size or duration.
Conclusion
With Microsoft’s free loan amortization schedule template, you can effortlessly manage your loan details in Excel. We’ve covered everything from downloading the template to customizing it for your unique needs. Hopefully, this guide has been helpful in showing you how to make the most of this tool.
Got questions or tips on using Excel templates? Leave a comment below—we’d love to hear from you!
Sample File
While I normally include sample files for my blog posts, I didn’t create this template. As such, I’m unable to provide a download link here. But the good news is that by following the steps above, you can easily get a copy directly from Microsoft.
FAQs
1. Can I use this template for any type of loan?
Yes, it works for most loans, including car loans, mortgages, and personal loans. Just adjust the inputs to match your loan terms.
2. What if I want to add custom columns to the table?
You can insert new columns, and Excel will preserve the table formatting. Be sure to adjust any formulas as needed.
3. Can I calculate bi-weekly or quarterly payments?
Yes, update the “Number of Payments per Year” field to 26 for bi-weekly or 4 for quarterly payments.
4. How do I print the schedule?
Go to File > Print, adjust the print area to include the table, and select a landscape orientation for better readability.
5. What happens if I delete rows in the table?
Deleting rows will adjust the table size, but be cautious not to remove any critical formulas.
Excel is not what it used to be.
You need the Excel Proficiency Roadmap now. Includes 6 steps for a successful journey, 3 things to avoid, and weekly Excel tips.
Want to learn Excel?
Our training programs start at $29 and will help you learn Excel quickly.
Can the template be used for non-standard payments that vary in amount? E.g. interest only payments, additional principal payments, etc?
Thanks Jeff. Can you advise on how to modify the template to reflect an installment loan when you have a draw date (say, July 3, 2024) that is before the first payment date (say, August 17, 2024)? I can’t seem to make this edit.