Default Workbook
Excel users find themselves making the same customizations over and over again. This post demonstrates how to store customizations such as cell formatting, headers, print preferences, the default PivotTable style, and cell styles, in a template workbook. Plus, we’ll see how the name and location of the template determines when it is used, and, if it is used as the default for new workbooks.
Objective
Let’s confirm our goal. Some Excel settings are defined within Excel, the application, and are thus made once and apply going forward. Examples are custom lists, showing the start screen when Excel starts, and the default file location, which can be set in the Excel Options dialog.
Some settings are stored within each Excel workbook (or worksheet), and only apply to that workbook (or worksheet). Examples are print options, headers, and custom and default PivotTable styles. Our goal is to make it fast to apply these customizations without using a macro.
To accomplish our goal, we’ll use an Excel template file. As we’ll discover, the template name and location are important. When we store it in the right spot with the right name, it can be used as the basis for new workbooks created with Ctrl+N. Let’s get to work.
Details
The basic steps are:
- Customize a new workbook
- Save as template
- Create new workbooks
- Modify the template
Customize a new workbook
First up, we need to create a new blank workbook and then make our customizations. This will ultimately become the template file, and thus, the customizations we make here will be applied to new workbooks created from this template.
You can go crazy with your customizations. Make any workbook, worksheet, or cell changes you’d like. You can modify cell styles, create new cell styles, create a PivotTable and then set the default PivotTable style, create a new PivotTable style, enter a default value in A1, apply cell formats, or set print options like scale. Get it all set up, just like you like it.
Once your customizations are made, clean up the workbook. This includes removing any unnecessary cell values, PivotTables, worksheets, etc, that you don’t want to be included each time you create a new workbook based on this file.
Save as template
Once your workbook is looking good, it is time to save it as a template.
A template is a workbook saved in a different format, xltx. Typically, when you open a template file, Excel actually creates a copy of the template file that you can then work with. The original template is left alone, and remains unchanged.
To save your customized workbook as a template, do a standard save. Since it is a new workbook, when you do a standard save, Excel will display the Save As dialog which needs the name, type, and location.

The values we enter for each of these is important, so, let’s discuss.
The first step is to decide how and when you want your new customized workbook to be used. You have two options. You can have Excel use it only when desired, or, you can have Excel use it as the basis for all new workbooks created with Ctrl+N.
If you want to use it as desired, and not as the basis for all new workbooks, then enter any name you’d like and change the type to Excel Template *.xltx. You may notice that when you change the save as type, Excel automatically changes the file location to a special folder that is designed to store user templates.

If you want to use it as the basis for new workbooks, then you have to use a specific name and location. Start by changing the file type to Excel Template *.xltx like before, Now, the file name needs to be book.xltx and the location needs to be the XLSTART folder.

Note that when you change the type to template, Excel automatically changes the path to the user templates folder, so, be sure to update the location to XLSTART after changing the file type to template.
In the previous Excel University post, we talked about how to find the location of the User Startup XLSTART folder using the Excel Options > Trust Center > Trust Center Settings > Trusted Locations.
Note: here is a link to that post if needed: https://www.excel-university.com/macro-toolbox/
To ensure that our new template is used as the basis for new workbooks, we exit and then relaunch Excel.
Now that we have saved our customized workbook as a template, we can use it to create new workbooks.
Create new workbooks
Now that we’ve saved the customized workbook as a template, it is time to use it to create new workbooks.
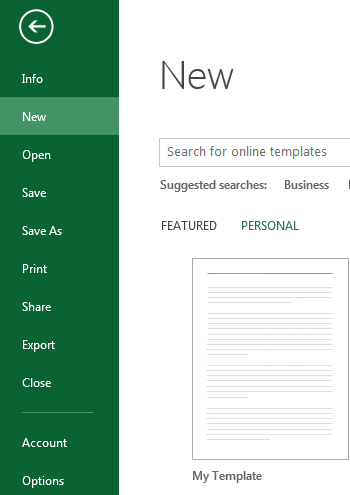
If you decided to use the template as desired, and not as the basis for all new workbooks, then simply use the File > New command. The New screen will allow you to view Personal templates, where your workbook template will appear. Click it, and a copy of the template is created for you to work with. Your template file is left alone, and will remain unchanged.
If you decided to use your customized workbook as the basis for new workbooks, then you can create a new workbook by using the Ctrl+N keyboard shortcut.

Bam…now you are ready to work, and all of those workbook customizations you used to make manually are already included in this workbook!
Please note that beginning with Excel 2013, the Blank workbook in the New screen is not based on the book.xltx workbook.
This is excellent!
But, there’s one more thing. Let’s differentiate between workbook-level settings and worksheet-level settings. Some of the settings we made above, such as cell styles and PivotTable styles were workbook-level settings, which apply throughout the workbook. But, some of the settings we made above, such as print options and headers, were actually worksheet-level settings. Now that we see this difference, here is a question for you. What happens when we insert a new worksheet into a workbook? Excel uses a blank worksheet, but, the good news is that we can set up a template for new worksheets as well! Just as the book.xltx is used as the basis for new workbooks, sheet.xltx is used as the basis for new worksheets inserted into a workbook. So, that means you can create a new workbook, make your sheet-level customizations, and then save it in the XLSTART folder. This template will be used as the basis for new worksheets.
Modify the template
The last thing is discussing how to make changes to the template file going forward. When you open a template file, Excel creates a copy for you to work with, and the original template file remains unchanged. So, if Excel creates a copy of the template when you open it, how do you make changes to it? Well, the trick is in how you open it.
If you open it with the File > New command or from within Windows Explorer (for example, by double-clicking it) then Excel creates a copy and opens the copy.
However, if you open it from within Excel, using the File > Open command, then, the template file is opened, allowing you to make any changes.
With our snazzy new template file, we are able to quickly apply a handful of customizations without using a macro, just like we wanted!
If you have any other tips about using template files, please share by posting a comment below…thanks!
Additional Notes
- You can also save book.xltx in another folder (besides XLSTART), and then create a shortcut to that file in the XLSTART folder. This technique is discussed in this post: https://www.excel-university.com/macro-toolbox/
Excel is not what it used to be.
You need the Excel Proficiency Roadmap now. Includes 6 steps for a successful journey, 3 things to avoid, and weekly Excel tips.
Want to learn Excel?
Our training programs start at $29 and will help you learn Excel quickly.
Excellent post. I’ve seen hours wasted just because a lot of people don’t use templates. I’m glad to see you address this topic.
Thanks 🙂
This sounds great! I remember a long time ago, I had thought about setting a macro to set up our normal worksheets, with date, name of author, path of file, etc. on each worksheet, but I never did it. Many times I will receive a copy of a worksheet with no path or file name and the person that made it is gone home. I know it takes a little time to put this information on each worksheet, but if you set up the template correctly, it should take care of most of this.
Super exposition, Jeff. Sometimes a person wants new files to have personalised footers and sometimes he doesn’t, and this post clears it up. I’d like to note that pressing the icon for new file (which typically resides in the Ribbon as “New from Template”, the white rectangle full-scap with the folded edge) is equivalent to CtrlN. There is no icon that will create a new file devoid of personalisations if the template has been so altered, but one can be created with VBA.