Allow Specific Section to be Edited
In this post, I’ll walk through the steps for how to allow users to edit specific cells in an Excel worksheet and lock down other cells. This is a useful feature when you want to protect certain data while still allowing users to make changes to other parts of your sheet. Ready? Let’s dive in!
Video
Step-by-step Tutorial
We’ll walk through the process using some illustrative exercise examples.
Exercise 1: Exploring the Locked Attribute
Let’s start by getting familiar with how protection works in Excel. When you create a new worksheet, you can edit any cell at any time. This is because Excel doesn’t automatically enforce any sort of protection when you create a new sheet. You can easily change values like customer names, addresses, or quantities in any cells without any restrictions.
However, if you’ve ever opened the Format Cells dialog and visited the Protection tab, you might have noticed that the Locked checkbox is checked by default.
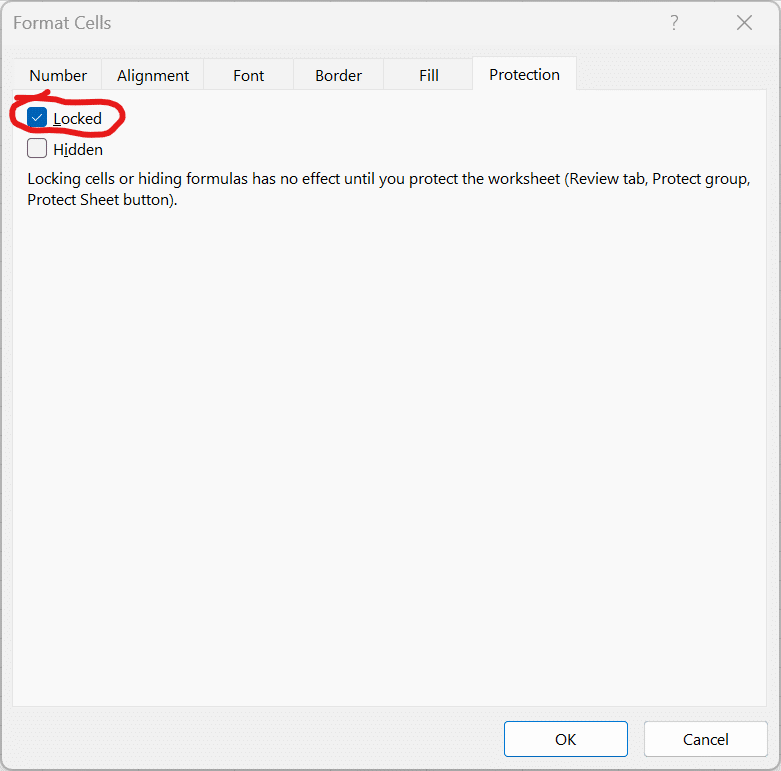
That is confusing, because if the cells are “locked,” why can we still edit them? The answer is: this “locked” status only takes effect once we turn on worksheet protection. Let’s explore this next.
Exercise 2: Enabling Worksheet Protection
Now, let’s take a look at how to activate worksheet protection. Here’s how you do it:
- Go to the Review tab in the Ribbon.
- Click Protect Sheet.
- You’ll be prompted to enter an optional password (this is required if you want to unprotect the sheet later).
- After entering the password (or skipping it), click OK.
Now that worksheet protection is active, the locked attribute kicks in. Now, if you try to change a locked cell, you’ll get an error message.
So, how do you allow people to edit certain cells while keeping others protected? Here’s how.
Allowing Edits in Specific Cells
If you want to allow users to edit specific cells, follow these two key steps:
Unlock the cells you want to be editable:
- First, unprotect the sheet (if protection is enabled) by going to the Review tab and selecting Unprotect Sheet.
- Then, select the cells you want users to edit, right-click, and choose Format Cells.
- Go to the Protection tab and uncheck the Locked checkbox.
- Click OK.
Protect the worksheet again by going to Review > Protect Sheet. Now, the cells you unlocked will be editable, while all other cells remain protected.
Fine-Tuning What Users Can Do
When you are protecting a worksheet, Excel gives you additional options to control what users can do even when the worksheet is protected.

Here’s how you can fine-tune these settings:
Protect Sheet Options:
- When you click Protect Sheet, you’ll see a list of actions you can allow users to perform, such as selecting locked cells, selecting unlocked cells, inserting rows, etc.
- You can choose to allow users to select only unlocked cells. This essentially limits their navigation to only the editable range of the worksheet. If they try to click outside of this range, nothing will happen—Excel “traps” them within the editable area.
Exercise 3: Using the Allow Edit Ranges Feature
Depending on your version of Excel, you might also have access to the Allow Edit Ranges feature, which gives you even more control. Here’s how it works:
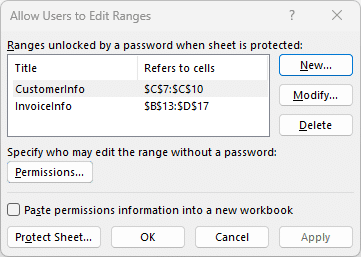
- Go to Review > Allow Edit Ranges.
- Click New to create a new editable range.
- Give the range a name (e.g., “Customer Info”) and specify the cells that users will be able to edit.
- Optionally, set a password for this range, so only users who know the password can make changes.
- Repeat this process for any other sections you want to make editable.
- Once you’ve defined your ranges, protect the sheet.
Now, users can edit only the ranges you’ve defined, and if you’ve set passwords, only those who know the corresponding passwords can access those areas.
Wrapping It All Up
In summary, allowing users to edit specific ranges in Excel is a two-step process:
- Unlock the cells you want them to edit by unchecking the Locked checkbox in the Format Cells dialog.
- Protect the worksheet, which enforces the locked or unlocked status.
Depending on your Excel version, you may also be able to use the Allow Edit Ranges feature to specify editable areas and even assign passwords to restrict access. This feature is handy for shared worksheets where multiple users need limited editing capabilities.
Hopefully, this guide has made the process of managing worksheet protection a little clearer. Feel free to explore these options in your own Excel workbooks, and let me know how it goes!
Sample File
You can download a sample file if desired:
FAQ
1. What happens if I forget my worksheet protection password?
If you forget the password, you won’t be able to unprotect the sheet unless you use third-party software to recover it. It’s a good idea to store passwords securely.
2. Can I lock specific cells without affecting the rest of the worksheet?
Yes! You can lock or unlock any combination of cells by following the steps we outlined above.
3. Do I need to set a password to protect my worksheet?
No, the password is optional. If you don’t set a password, anyone can unprotect the sheet.
4. Will other users know which cells are locked?
No visual indicator shows which cells are locked. Users will only find out when they try to edit a locked cell and receive an error message.
5. Can I protect a workbook as well as individual sheets?
Yes, Excel lets you protect the entire workbook, which includes things like preventing the addition or deletion of sheets. To do this, use the Protect Workbook command (instead of the Protect Sheet command).
6. Does protecting a sheet prevent users from copying data?
No, protection only restricts editing. Users can still copy data from locked cells unless you remove the ability for them to navigate to locked cells in the Protect Sheet dialog.
7. Can I apply different protection settings to different sheets in the same workbook?
Yes, each sheet has its own protection settings, so you can control them individually.
Excel is not what it used to be.
You need the Excel Proficiency Roadmap now. Includes 6 steps for a successful journey, 3 things to avoid, and weekly Excel tips.
Want to learn Excel?
Our training programs start at $29 and will help you learn Excel quickly.