Free Birthday Calendar for Gifts
If you’ve ever wanted to create a reusable calendar that automatically updates each year with birthdays, holidays, and special events, then this tutorial is for you! In this guide, we’ll walk through how to use an Excel template to set up a dynamic events calendar—perfect for printing and gifting to family members each year.
By the end of this tutorial, you’ll have a fully functional calendar that pulls events from a separate table, ensuring you don’t have to manually update each event every year. Let’s jump right in!
Video
Step-by-step Guide
Step 1: Download the Seasonal Calendar Template
Excel comes with a built-in template that serves as the perfect starting point for our recurring events calendar. Here’s how to access it:
Open Excel.
Click on File > New.
In the search bar, type Seasonal Calendar and hit Enter.
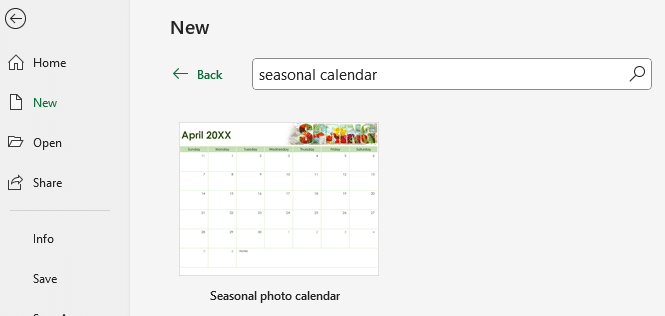
Click on the Seasonal Calendar template and then click Create.
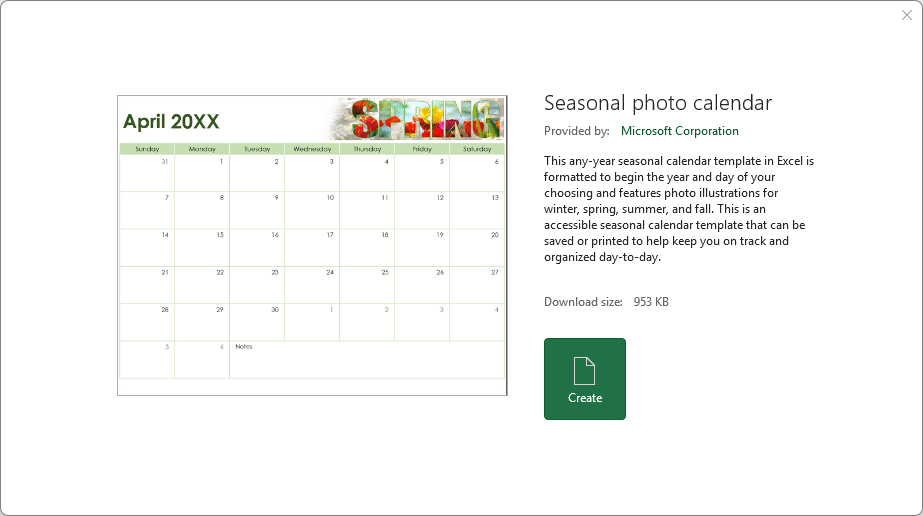
Once the template opens, you’ll see a workbook with a separate sheet for each month of the year.
This calendar is designed beautifully, and you can even customize the images if you’d like.
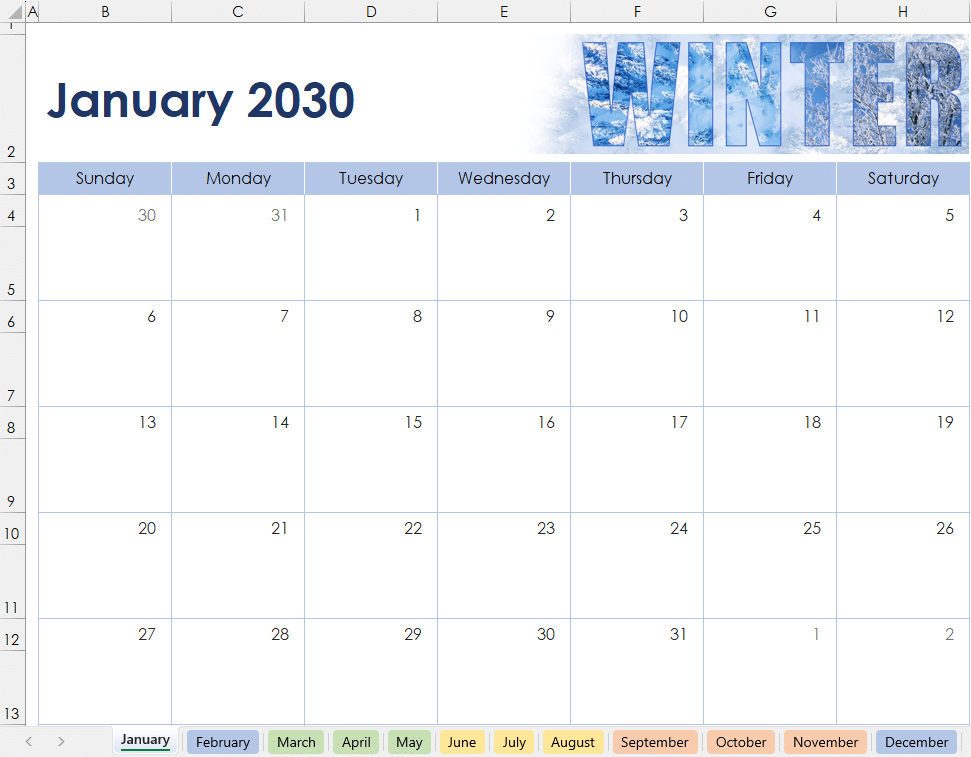
Step 2: Adjust Calendar Settings
The January worksheet includes some key settings that control the calendar:
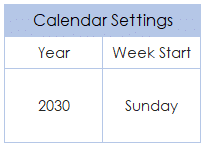
- Year: Change this to any year, and all months will update automatically.
- Week Start: Choose whether the calendar starts on Sunday or Monday.
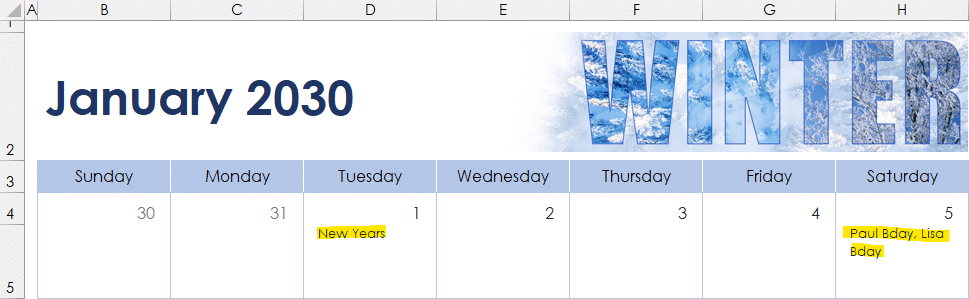
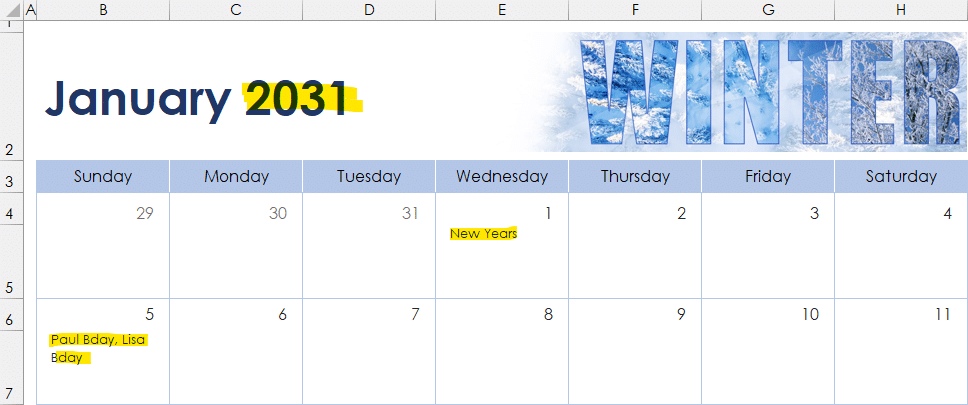
For example, if you set the year to 2030, all months will reflect that change instantly. This makes it easy to update the calendar each year with minimal effort.
Step 3: Create an Events Table
Rather than manually entering birthdays and holidays directly into the calendar (which won’t update correctly when you change the year), we’ll store them in a separate table and use formulas to pull the right events into the right days.
Setting Up the Events Worksheet
- Click the + button to add a new worksheet.
- Drag the new sheet to the beginning of the workbook.
- Rename it to Events.
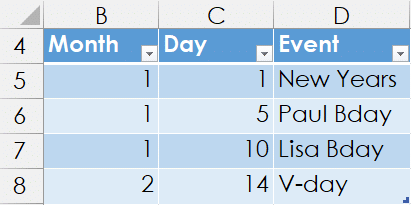
- Create three column headers:
- Month (e.g., 1 for January, 2 for February, etc.)
- Day (e.g., 1 for January 1st, 5 for January 5th, etc.)
- Event (e.g., “New Year’s Day,” “Jeff’s Birthday”)
Now, enter some sample data:
To make this easier to manage, convert this range into an Excel Table:
- Click anywhere inside the data.
- Go to Insert > Table and check the “My table has headers” box.
- Click OK.
By default, the table is named Table1, but you can rename it if you like.
Step 4: Use the FILTER Function to Retrieve Events
Now that our events are stored in a structured table, we’ll use the FILTER function to pull events into the correct dates.
Testing the Formula
Before adding the formula to the calendar, let’s test it:
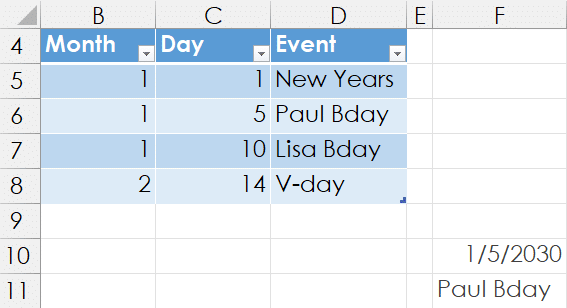
In any blank cell, enter a date, e.g., 1/5/2030.
Note: in the formula below, this was entered into cell F10.
Now we need a formula that will check the month and day of the entered date and return the corresponding event/s from our table. If no events exists for that day, it should return an empty string ("").
Use this formula to retrieve the event for that date (written in cell F11 in the screenshot below):
=FILTER(Table1[Event], (Table1[Month]=MONTH(A1)) * (Table1[Day]=DAY(A1)), "")
Where:
Table1[Event] (array)
- This specifies the column of data to be returned, which is the list of events in
Table1.
(Table1[Month] = MONTH(A1)) * (Table1[Day] = DAY(A1)) (include)
- This defines the filtering criteria:
Table1[Month] = MONTH(A1): Checks if the value in theMonthcolumn ofTable1matches the month of the date inA1.Table1[Day] = DAY(A1): Checks if the value in theDaycolumn ofTable1matches the day of the date inA1.- The multiplication (
*) acts as a logical AND, meaning both conditions must be true for a row to be included in the result.
"" ([if_empty])
- This specifies what to return if no data matches the criteria. In this case, an empty string (
"") is returned instead of an error.
This retrieves all events for the given date (regardless of year):
Step 5: Handle Multiple Events Per Day
If multiple events fall on the same day, the formula will “spill” into multiple rows, like this:
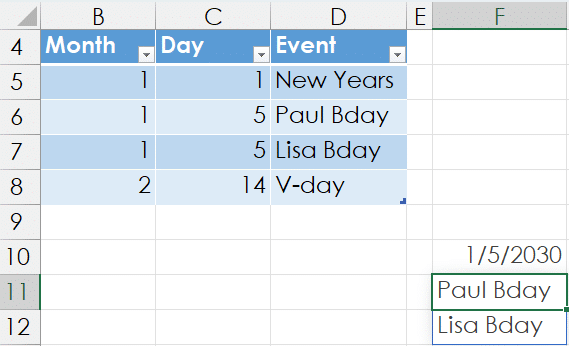
However, since our calendar only has one cell per day, we need to combine multiple events into a single cell.
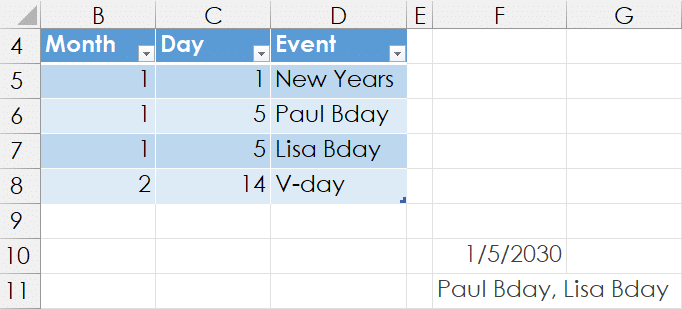
To do this, wrap the formula in the TEXTJOIN function:
=TEXTJOIN(", ", TRUE, FILTER(Table1[Event], (Table1[Month]=MONTH(A1)) * (Table1[Day]=DAY(A1)), ""))
This formula ensures that multiple events appear in a single cell, separated by commas, like this:
Step 6: Apply the Formula to the Calendar
Now that we have a working formula, we need to apply it to all calendar cells. Instead of manually entering the formula in each cell, we can copy and paste the formula efficiently:
Copy the cell with the working formula (CTRL + C).
Go to the January worksheet and select the appropriate calendar cells.
Instead of normal pasting, use Paste Special:
- Click Home > Paste > Paste Special > Formulas
Click OK.
Now, repeat this for each month’s worksheet.
Shortcut for Applying to All Months
To quickly paste the formula into all months:
- Click the January tab.
- Hold Shift, then click the December tab to select all months.
- Select the calendar cells where the formula should go.
- Use Paste Special > Formulas.
Now, all months have the same event-retrieval logic!
Step 7: Test the Dynamic Calendar
Now that everything is set up, let’s test it out:
- Go to the Events sheet and add a new event, e.g., “Valentine’s Day” on February 14th.
- Check the February tab—it should automatically display the event on the correct date.
- Change the year in the January tab—your events should still appear on the correct dates, ensuring your calendar is reusable every year!
Wrapping Up
With this dynamic Excel calendar, you no longer need to manually enter birthdays and holidays each year. By storing events in a separate table and using formulas to pull them into the calendar, you can print and gift a fully updated calendar in seconds.
Want to take it even further? Try customizing the images, adding colors, or even using conditional formatting to highlight important dates.
Now it’s your turn—give this a try and let me know how it works for you! If you have any questions, drop them in the comments below. Happy Excel-ing!
Sample file
While most of my posts include a link to a sample file, I’m unable to do so in this case because I did not create this template. It is freely available by Microsoft by using the steps shown in the tutorial above.
FAQ
1. Can I add more columns to the Events table?
Yes! You can add columns like “Category” (e.g., Birthday, Holiday) or “Notes” and modify the formula to include them.
2. What if I want a different calendar format?
You can explore other Excel templates by searching “Calendar” in File > New. The formula approach will still work with modifications.
3. Does this work in all versions of Excel?
The FILTER function is available in Excel 365 and Excel 2019.
4. How do I make the calendar start on a Monday?
Go to the January tab and change the “Week Start” setting. The calendar will update automatically.
Excel is not what it used to be.
You need the Excel Proficiency Roadmap now. Includes 6 steps for a successful journey, 3 things to avoid, and weekly Excel tips.
Want to learn Excel?
Our training programs start at $29 and will help you learn Excel quickly.