
Automate Shortcuts
Accountants spend hours working at computers, and usually much of that time they’re doing repetitive tasks—such as opening the same group of spreadsheets or creating the same header or formatting for each new workbook and document. Wouldn’t it make sense to invest a little time to create programs that perform these repetitive jobs with just a click of a mouse button?
Although I’ll show you how to create shortcuts—also known as macros—in Excel, you can use the same general procedures to create them in Word and many other applications.
But before creating the macros, I’ll show you how to create custom menus—convenient places to store the macros. In fact, if you develop many macros, you will probably want to also create a few custom menus—one for each group of macros and maybe some for various projects that use a unique set of macros.
To start, I will create a menu called Jeff that will contain two macros: One will open a chart of accounts workbook and the other will create a standard workbook header. Once it’s completed, here’s what the Jeff custom menu will look like after it’s installed in the taskbar (Exhibit 1)

Exhibit 1
Notice that when the Jeff menu is highlighted, a message pops up that lists all the macros it contains—in this case Open Chart of Accounts Workbook and My Standard Workbook Header. Notice also that each macro has one underlined letter—the O in Open Chart of Accounts Workbook and the M in My Standard Workbook Header. A fast way to evoke a macro is to hold down the Alt key while simultaneously striking the underlined letter: in this case Alt + O.
MENU MAKING
To create the Jeff custom menu, click on Tools, Customize. Then click on the Commands tab, and under the Categories list click on New Menu, as shown in Exhibit 2.

Exhibit 2
Now, using the mouse, drag New Menu from the Commands box up into the Excel menu bar, as already shown in Exhibit 1.
To name the new menu, leave the Customize box open, right-click on the new custom menu and type whatever name you wish to give it in the Name field, as shown in Exhibit 3. When you add an ampersand (&) in the menu name, the letter following the ampersand automatically is underlined, and that produces the shortcut (Alt + underlined letter following the &) for evoking it.

Exhibit 3
Now I’ll set up the macros in the menu. While still in the Categories menu, click on Macros, which is two items above New Menu, as shown in Exhibit 4.

Exhibit 4
Drag Custom Menu Item from the Commands box to your new custom menu in your toolbar, as shown in Exhibit 5.

Exhibit 5
Rename Custom Menu Item by right-clicking and typing Open Chart of Accounts Workbook. Repeat these steps to set up the My Standard Workbook Header menu item. Once that’s done the custom menu should look like Exhibit 1.
MACRO MAKING
The next task is to develop specialized macros. There are two ways to do this: writing the macro code or using the Record New Macro tool. I’ll show you how to do both. But before starting, it’s important that you understand how to organize them.
Macros are simply lines of text, or code, in a programming language called Visual Basic that Excel reads and then executes. The code is saved directly in workbooks. So we can see the code, Excel provides a special “viewer” called the Visual Basic Editor. Since the code can be saved in any workbook and performs tasks in other workbooks, it’s handy to save all of the macros in one workbook that contains only macros.
For the purposes of this exercise, create a workbook called Jeffs book of macros.xls; that’s where you should store them all. (Notice that the apostrophe in Jeffs was omitted: That’s because VBA programming sometimes misreads the apostrophe sign, so for safety sake it’s left out.) When this workbook is open, you can evoke any of the macros it contains.
To record the first macro, select Tools, Macros, Record New Macro. Name this macro my_header and click on OK, as shown in Exhibit 6.

Exhibit 6
While Excel is recording your keystrokes, set up a standard header by typing the text and applying the desired formatting. My standard header resembles Exhibit 7.

Exhibit 7
When you are finished creating the header, press the Stop Recording Button, as shown in Exhibit 8.

Exhibit 8
To enhance your skill in macro writing, I’ll also show you how to write the macro by hand—instead of using the macro recording feature. To get into the macro editor, select Tools, Macros, Visual Basic Editor. You will see the macro you just recorded, my_header, which is stored in Module1 as shown in Exhibit 9.

Exhibit 9
To write the new macro, type:
Sub open_chart( ).
Workbooks.Open “c:\my documents\chart.xls”
End Sub
Note that the open_chart macro assumes a workbook named chart.xls exists in the c:\my documents folder. After typing the open_chart macro, you should have two macros saved in the Jeffs book of macros.xls workbook. Save the workbook and exit the Visual Basic Editor.
The next step is to assign the macros to the custom menu. Click on Tools, Customize, and then right-click on the Open Chart of Accounts Workbook menu item and select Assign Macro, as shown in Exhibit 10.
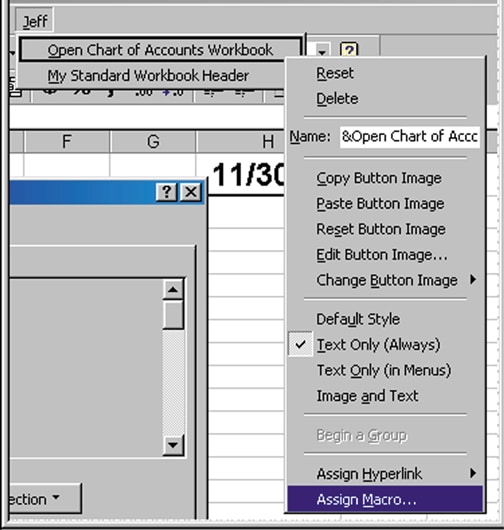
Exhibit 10
In the Assign Macro dialogue box, select the open_chart macro as shown in Exhibit 11. If no macros appear in the dialogue box, it’s probably because you failed to open the workbook that contains the macros Jeffs book of macros.xls.

Exhibit 11
REPEAT THE PROCESS
Following the same procedure, assign the my_header macro to the My Standard Workbook Header menu item. Now that the macros are assigned, close the Customize dialogue box and you can start to use the menus.
To make the macros available at all times, instruct Excel to open the Jeffs book of macros.xls whenever the application is launched. To do that, using Windows Explorer, move the workbook to the c:\program files\microsoft office\office\xlstart folder. Any workbook in this folder is automatically opened when Excel is started.
Finally, hide this workbook so it isn’t visible while you are working in Excel. To do this, open Jeffs book of macros.xls and select Hide from the Window menu, as shown in Exhibit 12.

Exhibit 12
Save changes to Jeffs book of macros.xls and exit Excel. Whenever Excel is launched that file will automatically open, but it will be hidden.
Now that you know the basics of establishing custom menus, you can automate almost any task in any application and launch it quickly with just a few mouse clicks.
Excel is not what it used to be.
You need the Excel Proficiency Roadmap now. Includes 6 steps for a successful journey, 3 things to avoid, and weekly Excel tips.


