Don’t Panic! Here’s How to Recover an Excel File Not Saved

Have you ever worked on an Excel project for hours, only for all of that effort to be lost because of one power outage that shut down your system? Everyone knows the panic that sets in when they’ve accidentally deleted important work. But, the good news is that not all is lost! There are a few ways to recover an Excel file that was not saved, and you can usually do so in just a few steps.
There are two very common scenarios in which files get lost: either you’re working on a new file that was never saved before, or you’re unable to save updates made to an existing file. Most of the time, the files can be retrieved either way, but the best method for recovering unsaved Excel files will differ based on your goal.
Recover a New Excel File That Was Not Saved
To restore your new file without any saved updates, open Microsoft Excel first. Then, click Open on the File tab on the Ribbon. At the bottom of the page, after selecting Recent, click Recover Unsaved Workbooks.
You’ll then be able to select any unsaved file in the Open window. That is all it takes to recover a new Excel file that was not saved. Excel’s built-in AutoSave and AutoRecover functionality make this method pretty easy, so be sure those are enabled.
Recover an Excel File with Unsaved Changes
If you were making changes to an Excel file and didn’t have the chance to save them before having to shut down the program, you’ll need another way to recover an Excel file that was not saved.
Once everything is working properly again, open up Excel. All unsaved Excel files should be shown in a Document Recovery pane that pops up when Excel was shut down incorrectly. All you’ll need to do is select the file you want to restore!
Keep in mind that just like the last method, this one only works when AutoSave is enabled.
Restore an Excel File to a Previous Version
Sometimes, unresponsive pages and premature application closing aren’t to blame for the loss of important files. Nearly everyone has accidentally overwritten a spreadsheet with updates only to realize later that they actually need the original file.
So, what you want is to get the previous file back. Here’s how to do it!
First, navigate over to the File tab. Then, select Info and Manage Workbook. That’s where you’ll find your previous versions of the workbook.
To restore the one you want, simply pick it from the list!
After clicking your previously saved version, Excel will prompt you to open it with the Restore option. You’ll have the choice to save the file under a new name, which is recommended – that way you don’t have to worry about accidentally overwriting it again in the future.
How to Prevent Lost Files in Excel by Enabling AutoSave & AutoUpdate
As you’ve seen by now, Excel does most of the work when it comes to recovering lost files – you just have to know how to find them.
That’s because Excel uses AutoSave and AutoRecover to automatically protect your work. Both features are enabled by default, but just in case they’ve been disabled for you, this is how to get them working again:
- After opening Excel, select File and Options.
- When the Options dialog box opens, select Save in the left pane.
- Make sure the “Save AutoRecover information” box and “Keep the last AutoRecovered version if I close without saving” box are both checked.
You’ll notice that “Save AutoRecover information” has an option to change the number of minutes. Feel free to change the length of time between AutoSaves if you want to!
By enabling the feature below as well, you can restore versions of your workbook that weren’t saved before Excel was closed.
Note that on some versions of Excel (like Excel for Mac), you’ll see a button that says AutoSave in the top left-hand corner of the Excel window. If it’s turned off, click it to turn it back on, and AutoSave will be enabled:

Create Backups for Peace of Mind
Auto-backup is a feature that makes a copy of the file each time you save it, and it’s one of the best ways to keep your data safe.
By allowing auto-backups, you’ll have a saved version of your last workbook even if your system crashes. Unlike AutoSave and AutoRecover, you can allow auto-backups for specific workbooks of your choosing.
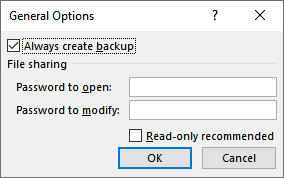
Click File on the Ribbon and then select Save As. Then, select Tools in the lower right corner and click General Options.
Alternatively, you can select File and then Options from the menu. Then select Save where you’ll see the AutoRecover option under Saved Workbooks.
You’ll see a dialog box that offers the option to Always create backup. Click OK and save it in the folder of your choice, and you’ll have auto-backups set for that workbook!
The backup file will have the extension .XLK. A popup may appear when you go to reopen the backup, but you can simply select “Yes” and the file will open. Also, your backups will always be one version “behind” your current version, so keep that in mind while making updates.
Use Cloud Services to Backup Lost Work
Back in the old days, before cloud storage became popular, many people saved their worksheets on a USB drive or some other type of external storage device. While you can still do that, it’s not always enough to protect your work – especially since USB drives themselves can be easily lost.
Saving your workbooks (or really, any important data) to a cloud service like OneDrive or Google Drive is the most secure way to keep everything safe. That way, you’ll know your work is being automatically backed up as you go.
Hopefully, you haven’t mourned the loss of any important files when Excel unexpectedly crashed in the past. These methods can help restore most unsaved work, so even if you do lose something, there’s a good chance you’ll be able to get it back.
Do you know any additional ways to recover unsaved workbooks? Let us know in the comments!
FREE: Excel Speed Challenge
If you enjoyed this post, please check out our free Excel speed challenge.

Watch one short Excel video a day for 5 days. Total video time is only 45 minutes. Learn the Excel skills that can help you save an hour a week.
Excel is not what it used to be.
You need the Excel Proficiency Roadmap now. Includes 6 steps for a successful journey, 3 things to avoid, and weekly Excel tips.
Want to learn Excel?
Our training programs start at $29 and will help you learn Excel quickly.
I have had issues with Autorecover working, and I went through the steps listed, and found that I did indeed have the “Save AutoRecover information” box and “Keep the last AutoRecovered version if I close without saving” box checked. However, while I was checking this, I noticed that somehow the “Disable AutoRecover for this workbook only” box under AutoREcover Exceptions WAS checked, so I unchecked it. Might advise folks to look at that as well.
Thanks Glenn 🙂
Awesome. Thank you!!
Glad it was helpful 🙂
THANK YOU!!!!!!
A frequently used Excel file just disappeared from my computer. Autosave enabled. Not in recent files; totally gone. Not in recycle bin/trash. Any ideas?
Thank you so much. This came to the rescue at a time of great crisis!
Thank you so much
I LOVE YOU. YOU SAVED ME HOURS OF WORK!
Thank you so much
Thank you myann
Auto recovery not worked but
Manage workbook helped me out
how to recover excel file that is in ENGAGEMENT?
A frequently used Excel file just disappeared from my computer. Autosave enabled. Not in recent files; totally gone. Not in recycle bin/trash. Any ideas?
MY WHOLE SPREADSHEET IN EXCELL WILL NOT ALLOW ME TO OPEN IT. IT IS TELLING ME IT HAS BEEN MOVED OR RENAME, I DID NEITHER. PLEASE HELP I HAVE A PRESENTATION IN A WEEK.