Combine Sheets From Workbooks as Separate Tabs (Not merged)
In today’s post, we’ll be diving into an exciting topic that springs up occasionally among Excel users: “How can you combine worksheets from different workbooks while keeping all the sheets separate in the resulting combined workbook?” Sounds tricky, doesn’t it? But don’t worry! We’ll be navigating through this method together. We’ll go step by step using a VBA macro to help us out.
Step by step
When thinking about how to combine the contents of multiple workbooks, my instinct would be to use Power Query. However, by default, Power Query will merge all of the data from all of the worksheets into a single table. In other words, it doesn’t preserve the individual worksheets. It instead takes all of the data from all of the workbooks and places the results into a single table. Which. Is. Awesome. But, it isn’t what we want to do here.
Here, we want to have Excel maintain the individual worksheets in the combined workbook. So, for this, we’ll get help from a short VBA macro which you can copy/paste directly into your workbook 🙂
We’ll walk through the steps using the following exercises.
Exercise 1: Insert the VBA code
To start with, let’s ensure our Developer tab is enabled in the Excel ribbon. If it’s not, follow these steps:
- Go to File > Options
- Go to Customize Ribbon
- Check the Developer tab checkbox
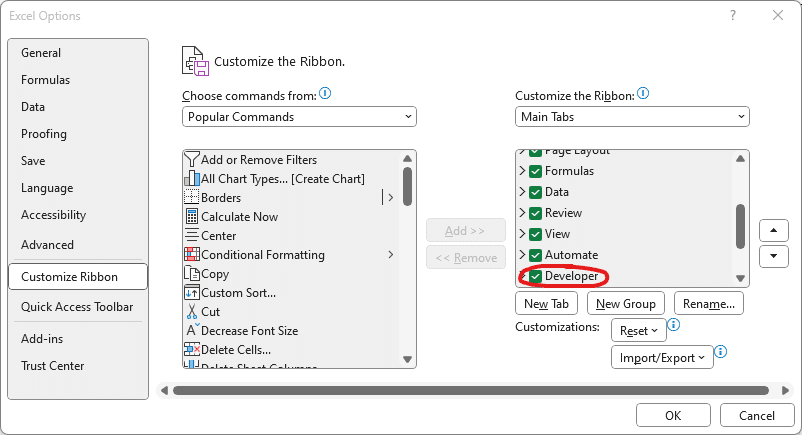
Now, you should be able to see the Developer tab in the ribbon.
Inserting the VBA Macro Code
- Click on the Developer tab
- Click on Visual Basic to open the VB Editor
- Right click the workbook name and Insert > Module
- Now, paste the following VBA code into the module
Sub CopyAllWorksheets()

Dim ws As Worksheet
Dim wbSource As Workbook, wbDest As Workbook
Dim myPath As String
Dim myFile As String
Dim myExtension As String

' Retrieve Target Folder Path From User
With Application.FileDialog(msoFileDialogFolderPicker)
    .Title = "Select a Folder"
    .AllowMultiSelect = False
    .Show
    myPath = .SelectedItems(1) & "\"
End With

' Target File Extension (must include wildcard "*")
myExtension = "*.xls*"

' Create a new workbook
Set wbDest = Workbooks.Add

' Target Path with Ending Extention
myFile = Dir(myPath & myExtension)

' Loop through each Excel file in folder
Do
    ' Set variable equal to opened workbook
    Set wbSource = Workbooks.Open(Filename:=myPath & myFile)

    ' Loop through each worksheet in Workbook
    For Each ws In wbSource.Worksheets
        ws.Copy After:=wbDest.Sheets(wbDest.Sheets.Count)
    Next ws

    ' Close the source workbook without saving
    wbSource.Close SaveChanges:=False

    ' Get the next file name
    myFile = Dir
Loop Until myFile = ""

' Remove the initial blank worksheet from the new workbook without warning
Application.DisplayAlerts = False
wbDest.Sheets(1).Delete
Application.DisplayAlerts = True


MsgBox "Operation Complete"

End Sub
Note: ChatGPT gave me a pretty good draft of this macro!
Close the Visual Basic editor and congratulations! Your macro has been successfully inserted.
Testing the Macro
Let’s run the macro and test it out. To do so:
- View > Macros > View Macros
- Select the new macro and click Run
- Browse and select the data folder, then click OK
- You should now see a message “Operation Complete” and a new workbook with the combined worksheets
Now, rather than needing to remember how to navigate to start the macro, let’s make it easier by adding a button to the worksheet.
Exercise 2: Making Macro Execution Easier
It may be difficult to remember how to navigate to this specific macro, especially if we run it infrequently, others use it, or we have numerous macros in our workbook. Wouldn’t it be so much better if we could launch the macro with a single click? Say hello to the Run button.
To insert a button that will execute the macro:
- Developer > Insert
- Form Controls > Button
- Click to place this button anywhere in your worksheet
- Excel will prompt to ask which macro to run
- Pick your macro from the list
- Click the button text to rename it to something like Run
Bam:
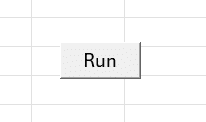
Now we can click the Run button to execute the macro … sweet!
Exercise 3: Making Macro Execution Even Easier
When you run the macro as is, it will ask you to browse to the data folder. Which is fine. But, if you’re always pulling data from the same location, consider setting a default destination for the macro so you don’t have to browse each time it runs.
- Type the file path into a cell
- Remember to include the trailing slash
- Select that cell
- Name the cell (we’ll go with “path”) by typing it into the Name Box and hitting Enter
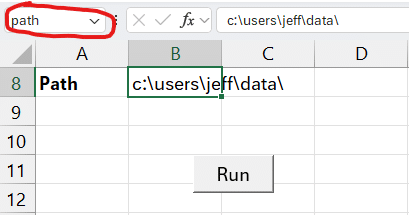
One you’ve named the cell that stores the file path, we need to make a tweak to the macro code.
Open the VB Editor by clicking Developer > Visual Basic.
Editing the code is like using a word processor, so you just change this bit of code:
' Retrieve Target Folder Path From User
With Application.FileDialog(msoFileDialogFolderPicker)
.Title = "Select a Folder"
.AllowMultiSelect = False
.Show
myPath = .SelectedItems(1) & "\"
End With
To this:
' Retrieve Target Folder Path From User
myPath = Range("path").Value
Note: if you named the cell something other than “path” use your name here instead.
Now, each time you run the macro, it will fetch data from the specified folder instead of prompting you to browse to it.
Saving the VBA File
To run this macro again, we’ll want to save this file. If we try to save it as a normal Excel file, with an xlsx extension, the vba code won’t be saved. So, instead, we’ll save it as a macro-enabled workbook with an xlsm extension.
Then, anytime we want to combine the workbooks, we open this vba workbook and click Run 🙂
This VBA approach has simplified the process of combining multiple sheets from workbooks while keeping them separate – making the process efficient and painless.
If you have any alternatives, questions, or enhancements, please share by posting a comment below … thanks!
Sample File
Download the Example File which includes the code.
Frequently Asked Questions
What is VBA in Excel?
VBA, or Visual Basic for Applications, is a programming language included with Excel and other Microsoft Office programs. It allows users to automate repetitive tasks and create custom functions and complex analyses within Excel. VBA enables the creation of macros, user-defined functions, and custom forms, enhancing Excel’s capabilities beyond its standard features.
How can I enable the Developer tab in Excel?
Go to File > Options > Customize Ribbon. Under the right pane, check the box next to Developer and click OK.
How do I insert a macro using the VB editor?
To insert a macro using the VB Editor in Excel, follow these steps:
- Press Alt + F11 to open the VB Editor.
- In the Project Explorer, right-click on any of the objects (like ThisWorkbook, Sheet1, etc.) and select Insert > Module. This creates a new module.
- In the newly created module, type your macro code.
- To save your macro, close the VB Editor and return to Excel.
How do I run a VBA macro?
To run a VBA macro in Excel, you can do one of the following:
- Press Alt + F8 to open the “Macro” dialog box, select the macro you want to run, and click Run.
- Use a shortcut key if you assigned one to your macro.
- Click a button or link to the macro if you have created one in your worksheet.
How can I create a button to run a macro in Excel?
To create a button to run a macro in Excel:
- Ensure the Developer tab is enabled.
- Go to the Developer tab, click on Insert in the Controls group, and select a Button (Form Control).
- Draw the button on your sheet.
- The “Assign Macro” dialog will appear. Select the macro you wish to assign to the button and click OK.
Where can I dig deeper with VBA?
Our Masters 2 class teaches VBA. More info here.
Excel is not what it used to be.
You need the Excel Proficiency Roadmap now. Includes 6 steps for a successful journey, 3 things to avoid, and weekly Excel tips.
Want to learn Excel?
Our training programs start at $29 and will help you learn Excel quickly.
Does the above deal with references to other sheets within the source workbook ?
and named ranges
and Data validation from lists on the same worksheet, other worksheets, or even other workbooks, as well as charts
Having copied all the wanted sheets,
Excel will adjust sheet references 4 U
then, for each sheet in the source
search for a string such as “£$1%^”
and – if found, increment the number for another string to check.
having got a string that is not in the sheet,
in that sheet replace all “=” with the string.
Then copy all the data (used cells) in the source sheet
and
paste special formulas
then replace the “£$1%^” with “=”
That should get the formulas back, but referencing to sheets in the new workbook.
maybe do that in sets of columns on systems with not much RAM
But … that may not deal with all cells set as text that contain formulas.
And there is also the problem of names for ranges
that should, along with data validation, and pivot tables, Charts, etc.
have been done before the paste special.